March, 14th 2018
| Revision History | |
|---|---|
| Revision 2.9 | March, 14th 2018 |
| |
| Revision 2.8 | July, 15th 2013 |
| |
| Revision 2.7 | Dec, 7th 2011 |
| |
| Revision 2.6 | Dec, 15th 2010 |
| |
| Revision 2.5 | Sep, 8th 2010 |
| |
| Revision 2.4 | Oct, 1st 2009 |
| Minor corrections according to miscellaneous changes. | |
| Revision 2.3 | May, 14th 2009 |
| |
| Revision 2.2 | Sep, 21st 2008 |
| Minor corrections according bug fixes and miscellaneous changes. | |
| Revision 2.1 | Oct, 31st 2007 |
| |
| Revision 2.0 | Sep, 27th 2007 |
| License modification: minor changes. | |
| Revision 1.0 | June, 1st 2006 |
| First release of the user guide. | |
CLI is a library and a set of tools that allow you to easily develop text-based user interfaces. So far, what you have to do is:
- Writing an XML resource file;
- Transforming it using the tools of the library;
- Plugging it into an existing program.
These points are discussed in the How to use it section.
The XML resource file section is a reference manual for XML resource files syntax, and the UI controls section describes additional classes that help interacting with the user.
Eventually the Advanced section gives advanced information for users having specific needs.
The CLI library can be downloaded from here in the form of gzipped archives.
Regular Linux installs usually have everything needed to have the CLI library compile. If you compile on Windows, you may install Cygwin.
Here is a list of required utilities:
- make
- python 2.7
- dos2unix and unix2dos
- g++
- ncurses devel (Linux and Cygwin only)
Plus, for Java users:
- JDK (optional)
- x86_64-w64-mingw32-g++ (optional, Cygwin only)
Plus, optionally, for unit tests (make check):
- xmllint (optional)
- xsltproc (optional)
- gawk (optional)
- pylint (optional)
Tip
Make sure your antivirus will not block network operations for binaries generated and executed for unit-tests. If so, configure antivirus exceptions.or documentation generation (make doc):
- doxygen (optional)
- xsltproc and docbook_xsl (optional)
- dot (optional)
- mscgen (optional)
Once you have downloaded the archive, unpack it on your disk:
tar xvfz cli-X.Y.tgz
and declare a CLI_DIR environment variable that points to directory just extracted:
export CLI_DIR=$(pwd)/cli-X.Y
Optionally, if you want to use Java set the JAVA_HOME environment variable:
export JAVA_HOME="$(dirname "$(dirname "$(which javac)")")"
Note
In as much as the Java CLI library is based on the JNI technology, a full JDK needs to be used.
Go to build/make:
cd ${CLI_DIR}/build/makeand build:
make
or (debug version):
make _DEBUG=1
This compilation will run over C++ and Java (depending on JAVA_HOME value) library compilations.
Note
You may also execute the library unit tests with the following command:make checkor:
make _DEBUG= check
Output libraries go in the following directories:
- C++:
- directory:
${CLI_DIR}/cpp/build/make/${TARGET}${CXX}/${RDX}, - file:
${STATIC_LIB_PREFIX}clicpp${STATIC_LIB_SUFFIX},
- directory:
- Java:
- directory:
${CLI_DIR}/java/build/make/${RDX}, - files:
cli.jarand${DYN_LIB_PREFIX}cli${DYN_LIB_SUFFIX},
- directory:
with:
RDX- 'Release' or 'Debug',
TARGET- OS the library has been compiled for (eg. 'Linux', 'Cygwin'),
CXX- Name of the compiler (eg. 'g++').
STATIC_LIB_PREFIX- Dynamic library prefix for the given OS (eg. 'lib' or nothing).
STATIC_LIB_SUFFIX- Dynamic library extension (eg. '.lib', '.a').
DYN_LIB_PREFIX- Dynamic library prefix (eg. 'lib' or nothing).
DYN_LIB_SUFFIX- Dynamic library extension (eg. '.dll', '.so').
The basic process is the following:
- Creation of an XML resource file;
- Transformation of the XML resource file into target language code;
- Integration.
The content of the XML resource file will be presented in the next section. The transformation and integration steps are discussed here.
The transformation of the XML resource file into target language code is very easy. It is nothing but a simple transformation.
Example 1. Transformation of an XML resource file
Try it out! Here is a sample CLI resource file:
<?xml version="1.0" encoding="utf-8"?>
<cli xmlns="http://alexis.royer.free.fr/CLI" name="myCLI">
</cli>
Copy the stuff into a new empty.xml file.
Let's say we want to have C++.
Launch the transformation from XML to C++ using the cli2cpp.py python script:
python ${CLI_DIR}/tools/cli2cpp.py empty.xml --output empty.cppThat's all folks! Have a look at the generated C++ file if you want.
And it works with java as well!
python ${CLI_DIR}/tools/cli2java.py --cli-class-name "Empty" empty.xml --output Empty.javaHave a look at the generated Java file.
You're now ready to compile.
Note
This code generation was originally processed thanks tocli2cpp.xsl and cli2java.xsl XSLT stylesheets.
However, in as much as the python script equivalents introduced in version 2.8 work better and faster,
these original stylesheets are still provided within the ${CLI_DIR}/tools/ directory, but are now declared deprecated since version 2.9.
The cli2cpp.py and cli2java.py python scripts come with --help options:
$ python ${CLI_DIR}/tools/cli2cpp.py --help
usage: cli2cpp [-h] [--version] [--cli-class-name CLI_CLASS_NAME]
               [--cli-class-scope CLI_CLASS_SCOPE] [--static | --no-static]
               [--class-prefix CLASS_PREFIX] [--var-prefix VAR_PREFIX]
               [--indent INDENT] [--user-indent USER_INDENT] [--output OUTPUT]
               xml-res

positional arguments:
  xml-res               CLI XML resource file

optional arguments:
  -h, --help            show this help message and exit
  --version             show program's version number and exit
  --cli-class-name CLI_CLASS_NAME
                        Main CLI class name (default is based on CLASS_PREFIX
                        and @name attribute).
  --cli-class-scope CLI_CLASS_SCOPE
                        Main CLI class scope (default is empty).
  --static              Static instance creation
  --no-static           No static instance creation (default)
  --class-prefix CLASS_PREFIX
                        Class prefix (default is empty).
  --var-prefix VAR_PREFIX
                        Variable prefix (default is 'm_pcli_').
  --indent INDENT       Indentation pattern (default is 4 spaces).
  --user-indent USER_INDENT
                        User-code indentation pattern (default is '/* > */ ').
  --output OUTPUT       Output file (by default the result is printed out in
                        the standard output)
$ python ${CLI_DIR}/tools/cli2java.py --help
usage: cli2java [-h] [--version] [--cli-class-name CLI_CLASS_NAME]
                [--cli-class-scope CLI_CLASS_SCOPE]
                [--class-prefix CLASS_PREFIX] [--var-prefix VAR_PREFIX]
                [--indent INDENT] [--user-indent USER_INDENT]
                [--output OUTPUT]
                xml-res

positional arguments:
  xml-res               CLI XML resource file

optional arguments:
  -h, --help            show this help message and exit
  --version             show program's version number and exit
  --cli-class-name CLI_CLASS_NAME
                        Main CLI class name (default is based on CLASS_PREFIX
                        and @name attribute).
  --cli-class-scope CLI_CLASS_SCOPE
                        Main CLI class scope (default is empty).
  --class-prefix CLASS_PREFIX
                        Class prefix (default is empty).
  --var-prefix VAR_PREFIX
                        Variable prefix (default is 'm_cli').
  --indent INDENT       Indentation pattern (default is 4 spaces).
  --user-indent USER_INDENT
                        User-code indentation pattern (default is '/* > */ ').
  --output OUTPUT       Output file (by default the result is printed out in
                        the standard output)
Note
If you have a look at the output source code, the complexity of this generated code may disturb you. As a matter of fact, since it is some managed code, you are not supposed to get into it, and even less supposed to modify it. But, you may however also figure out that it is nevertheless quite well presented:- Indentation is respected;
- User-code is highlighted thanks to the
STR_UserIndentpattern at the beginning of the lines; - The current word sequence in analysis is presented in comments throughout the code.
Now that you have your target language file, you want to have a CLI program running don't you?
OK! Let's do it. Here is the trick for C++.
Try to compile empty.cpp and link.
You should have a missing symbol: main.
Not a big deal!
You create a new C++ file with a main function we will launch the CLI in.
This is done through the Run method
with a device parameter of the cli::Shell class.
Though, you need to give a cli::Cli reference at the beginning.
Different strategies at this point:
- CLI instantiation from the user code (preferred method);
- Static CLI instantiation and retrieval through
cli::Cli::FindFromNameand a regular expression (deprecated but maintained); - Static CLI creation and use of the
cppattribute of theclielement in the XML resource file (definitely deprecated, this method has been undocumented);
Example 2. C++ integration - instantiation from user code
Use cli2cpp.py parameters to give an explicit name to CLI class generated:
python ${CLI_DIR}/tools/cli2cpp.py --cli-class-name "EmptyCli" empty.xml --output empty_cli.h
Create a goempty.cpp file that simply includes empty_cli.h and make the instantiation at the appropriate time:
#include "cli/common.h"
#include "cli/console.h"
#include "empty_cli.h"

int main(void) {
    EmptyCli cli_EmptyCli;
    cli::Shell cli_Shell(cli_EmptyCli);
    cli::Console cli_Console(false);
    cli_Shell.Run(cli_Console);
}
Compile and link (with g++ for instance):
g++ -I${CLI_DIR}/cpp/include -Wno-unused-label -c goempty.cpp
g++ -o empty goempty.o -L${CLI_DIR}/cpp/build/make/Cygwing++/Release -lclicpp -lncurses
And run:
./empty
Great for an empty stuff, ain't it?
Example 3. C++ integration - static instantiation
Use cli2cpp.py parameters to activate static CLI creation:
python ${CLI_DIR}/tools/cli2cpp.py --static empty.xml --output empty_cli.cpp
Then the file goempty2.cpp below looks for CLI instances that had been created thanks to a regular expression on their names:
#include "cli/common.h"
#include "cli/console.h"

int main(void) {
    cli::Cli::List cli_List(10);
    const int i_Clis = cli::Cli::FindFromName(cli_List, ".*");
    if (i_Clis == 0)
    {
        fprintf(stderr, "Error: No CLI found.\n");
        return -1;
    }
    else if (i_Clis > 1)
    {
        fprintf(stderr, "Warning: Several CLIs found. Executing only the first one.\n");
    }
    cli::Shell cli_Shell(*cli_List.GetHead());
    cli::Console cli_Console(false);
    cli_Shell.Run(cli_Console);
}
Once again, compile and link:
g++ -I${CLI_DIR}/cpp/include -Wno-unused-label -c empty_cli.cpp
g++ -I${CLI_DIR}/cpp/include -c goempty2.cpp
g++ -o empty2 empty_cli.o goempty2.o -L${CLI_DIR}/cpp/build/make/${TARGET}${CXX}/${RDX} -lclicpp -lncurses
And run:
./empty2
No static instantiation works in Java.
The best way to instantiate the CLI object is to retrieve the class from its name,
then to call newInstance on it.
That's what is presented in the example below.
Example 4. Java integration
Considering you have generated a Empty.java file
as described in the Transformation section,
you may just compile this file with javac,
and another source file GoEmpty.java loading the Empty class:
class GoEmpty {
    public static void main(String ARJ_Args[]) {
        // Load the class.
        cli.Cli cli_Cli = null;
        try {
            Class j_CliClass = Class.forName("Empty");
            cli_Cli = (cli.Cli) j_CliClass.newInstance();
        } catch (Exception e) {
            e.printStackTrace();
            return;
        }
        // Create an I/O device.
        cli.IODevice.Interface cli_Input = new cli.Console();
        // Create a shell.
        cli.Shell cli_Shell = new cli.Shell(cli_Cli);
        // Launch the shell.
        cli_Shell.run(cli_Input);
    }
}
Define a CLI_JAVA_DIR that points to the place where you installed the CLI library.
Either point directly compilation outputs in the ${CLI_DIR}/java/build/make/${RDX} directory,
or copy cli.jar and ${DYN_LIB_PREFIX}cli${DYN_LIB_SUFFIX} in your own directory and point to it.
Compile:
javac -classpath ${CLI_JAVA_DIR}/cli.jar GoEmpty.java Empty.javaFinally run:
java -classpath "${CLI_JAVA_DIR}/cli.jar;." -Djava.library.path=${CLI_JAVA_DIR} GoEmpty
Note
If you get stuck at this point, please read the dedicated FAQ.
The -classpath option let the Java Virtual Machine know were to find the CLI Java objects.
The -Djava.library.path= option tells the Java Virtual Machine where to load the CLI native library from.
CLI_JAVA_DIR can point to an external installation path,
or directly to the ${CLI_DIR}/java/build/make/${RDX} output directory in a devel configuration.
But you may prefer to copy Java output files in your own execution directory.
These options become useless then.
The examples above showed you how to create and launch an empty CLI. Now you want to do more interesting stuff, don't you?
Oh yes I do!
So go to next section.
THAT's interesting!
The root element, named cli, directly defines the CLI.
It has only one resource related attribute: name.
It obviously gives the name of the CLI.
Note
The name of the CLI is used in the prompt.
OK! Nothing more for the moment. I would like to define my own commands now.
Keywords and end of lines are the basics of a CLI.
Example 5. Hello world!
hello.xml
implementing the command line:
<?xml version="1.0" encoding="utf-8"?>
<cli xmlns="http://alexis.royer.free.fr/CLI" name="Hello">
 <keyword string="say">
  <keyword string="hello">
   <endl></endl>
  </keyword>
 </keyword>
</cli>
If you want to add another command line shout hello, here is how your
hello.xml file should look like:
<?xml version="1.0" encoding="utf-8"?>
<cli xmlns="http://alexis.royer.free.fr/CLI" name="Hello">
 <keyword string="say">
  <keyword string="hello">
   <endl></endl>
  </keyword>
 </keyword>
 <keyword string="shout">
  <keyword string="hello">
   <endl></endl>
  </keyword>
 </keyword>
</cli>
Now if you want to add other command lines say bye and shout bye, have a look at the corresponding XML resource file:
<?xml version="1.0" encoding="utf-8"?>
<cli xmlns="http://alexis.royer.free.fr/CLI" name="Hello">
 <keyword string="say">
  <keyword string="hello">
   <endl></endl>
  </keyword>
  <keyword string="bye">
   <endl></endl>
  </keyword>
 </keyword>
 <keyword string="shout">
  <keyword string="hello">
   <endl></endl>
  </keyword>
  <keyword string="bye">
   <endl></endl>
  </keyword>
 </keyword>
</cli>
Considering certain command lines have keywords in common, like say hello and say bye in the previous example, eventually what you define is a syntax tree. A first node corresponds to the keyword say, which has two children hello and bye. For an illustration of that syntax tree, load the XML file of the last example into your favorite web browser and play with toggles.
Cool! I've tried it out. I can define my own keywords and so. It's pretty cool, but that's a pity there's no help for my commands.
Hold on! Next section tells how to do that.
CLI is basically a user interface,
so that's a good idea to give help as much as you can.
It's easy to do such a thing in XML resource files.
help elements can be added to CLI elements
to document them.
The lang attribute identifies
the corresponding language.
Example 6. Put help everywhere
hello.xml file:
<?xml version="1.0" encoding="utf-8"?>
<cli xmlns="http://alexis.royer.free.fr/CLI" name="Hello"><help lang="en">Hello menu</help><help lang="fr">Menu Hello</help>
 <keyword string="say"><help lang="en">Say something.</help><help lang="fr">Dire quelque chose.</help>
  <keyword string="hello"><help lang="en">Say hello.</help><help lang="fr">Dire bonjour.</help>
   <endl></endl>
  </keyword>
  <keyword string="bye"><help lang="en">Say goodbye.</help><help lang="fr">Dire au revoir.</help>
   <endl></endl>
  </keyword>
 </keyword>
</cli>
Note
Only theen and fr language identifiers
are available for the moment.
That's what I needed, but wait a minute! I will have to write down a user manual for this interface and I'm afraid about describing the thing twice, between my user manual on one hand, and the help provided with the commands on the other hand. Any suggestion?
For sure, automatic documentation generation will help you. This feature is described in a later section.
Good! Now, how do I execute stuff from the command lines?
Target language instructions are inserted straight forward in the XML resource file through target language tags:
cppfor C++javafor Java- ...
Basically, these tags are located in endl elements.
It allows you to define what is executed
when a command line has been successfully parsed.
Example 7. Insert target language instructions
sayHello,
or a Java class HelloApi,
and you would like those to be called when the user types say hello.
This is how you would do it:
<?xml version="1.0" encoding="utf-8"?>
<cli xmlns="http://alexis.royer.free.fr/CLI" name="Hello">
 <keyword string="say">
  <keyword string="hello">
   <endl>
    <cpp>sayHello();</cpp>
    <java>HelloApi.sayHello();</java>
   </endl>
  </keyword>
 </keyword>
</cli>
If you try to transform and compile the sample as is in C++, it should not work straight forward.
Since helloWorld is not declared, the output does not compile.
The trick is to use special sections as below:
<?xml version="1.0" encoding="utf-8"?>
<cli xmlns="http://alexis.royer.free.fr/CLI" name="Hello">
 <cpp option="include">#include "hello_api.h"</cpp>
 <java option="import">import cli.test.samples.HelloApi;</java>
 <keyword string="say">
  <keyword string="hello">
   <endl>
    <cpp>sayHello();</cpp>
    <java>HelloApi.sayHello();</java>
   </endl>
  </keyword>
 </keyword>
</cli>
Have a C++ sayHello function declaration
in a hello_api.h file, and it should work.
Declare a sayHello in a HelloApi class, and it should work as well.
cpp and java
are not restricted to endl elements.
You can attach target code to almost any element of your syntax tree,
as shown in examples Syntax tags - An optional command line
and Syntax tags - Another optional command line.
Note
The user code to be executed is given straight away in the XML resource file. This may seem weird at frst, but it is however, to my point of view, a nice way to do. You've got everything in a single readable file. Thus, it's easy to maintain. On the other hand, it's easy to understand what is executed on each command. And if you indent your XML resource file elegantly, it could look like a piece of code somehow.
Now you may need to print out results.
Use the out
and err elements for that.
Use them like std::cout and std::cerr in C++,
and use the cli::endl constant for carriage returns.
Use put and endl methods in Java.
Example 8. Output
<?xml version="1.0" encoding="utf-8"?>
<cli xmlns="http://alexis.royer.free.fr/CLI" name="Hello">
 <keyword string="say">
  <keyword string="hello">
   <endl>
    <cpp><out/> << "Hello world!" << cli::endl;</cpp>
    <java><out/>.put("Hello world!").endl();</java>
   </endl>
  </keyword>
 </keyword>
</cli>
Tip
You'd rather useout
and err
than std::cout and std::cerr
in XML resource files.
Indeed, CLI redirects these outputs for you.
Basically,
if it is launched from the console, output is sent in the console,
if it is launched from a TCP connection, output is sent on this TCP connection...
without changing anything in your XML resource file.
Special sections have been introduced in the example above. Here is the detail of how they are organized, for C++ generation:
headsection: you may use this section for very first includes or for pre-processing for instance- (auto-generated) CLI includes.
includesection: this section basically receives user includes.- (auto-generated) CLI definition:
the static CLI structure, and the related command executions are defined here.
Within that section, the following subsections are available for each menu:
memberssection: this section receives member variables or methods for the current menu.constructorsection: this section receives code to be placed in the constructor of the current menu.
tailsection: very last section.
Java sections look the same except for the include section,
which is named import in Java.
Note
C++ sections have changed a lot in version 2.1, being greatly improved thanks to Java experience.I got it. Now, tell me, how do I have users entering values?
param elements can be used
instead of keyword elements.
Obviously, this kind of element controls parameters elements.
The CLI library manages different types of parameters:
- strings
- integers
- floats
- host names
Example 9. Parameters
param elements:
<?xml version="1.0" encoding="utf-8"?>
<cli xmlns="http://alexis.royer.free.fr/CLI" name="Params">
 <keyword string="enter">
  <keyword string="string">
   <param type="string" id="a-string">
    <endl>
     <cpp><out/> << <value-of param="a-string"/> << cli::endl;</cpp>
     <java><out/>.put(<value-of param="a-string"/>).endl();</java>
    </endl>
   </param>
  </keyword>
  <keyword string="int">
   <param type="int" id="an-int">
    <endl>
     <cpp><out/> << <value-of param="an-int"/> << cli::endl;</cpp>
     <java><out/>.put(<value-of param="an-int"/>).endl();</java>
    </endl>
   </param>
  </keyword>
  <keyword string="float">
   <param type="float" id="a-float">
    <endl>
     <cpp><out/> << <value-of param="a-float"/> << cli::endl;</cpp>
     <java><out/>.put(<value-of param="a-float"/>).endl();</java>
    </endl>
   </param>
  </keyword>
  <keyword string="host">
   <param type="host" id="a-host">
    <endl>
     <cpp><out/> << <value-of param="a-host"/> << cli::endl;</cpp>
     <java><out/>.put(<value-of param="a-host"/>).endl();</java>
    </endl>
   </param>
  </keyword>
 </keyword>
</cli>
Have a look at the way you get access to the entered values:
through param attributes
of value-of elements.
Note
A full support of host names is not provided yet.How do I make the user enter data out of command lines?
This is discussed apart from the XML resource file section in the UI controls section.
Well, I can do lots of things now, but a simple syntax tree is limitative, don't you think?
I know, that's the reason why I've created
tag elements.
Tags act like labels and gotos do in C/C++.
The equivalent of the label definition
is a tag element
with an id attribute.
And the equivalent of a goto statement
is a tag element
with a ref attribute.
Thanks to tags, you can define such kind of patterns:
- a*
- a+
- (ab)*
- (ab)+
- a(b1|b2)c
- a(b1|b2|)c
- (a|b)*
- (a|b)+
The following examples show you how to do such syntax patterns.
Example 10. Syntax tags - a* patterns
,-> | | `-- |
<?xml version="1.0" encoding="utf-8"?> <cli xmlns="http://alexis.royer.free.fr/CLI" name="a*"> <tag id="my-tag"> <endl></endl> <keyword string="a"> <tag ref="my-tag" max="unbounded"/> </keyword> </tag> </cli> |
Example 11. Syntax tags - a+ patterns
,-> | | `-- |
<?xml version="1.0" encoding="utf-8"?> <cli xmlns="http://alexis.royer.free.fr/CLI" name="a+"> <tag id="my-tag"> <keyword string="a"> <endl></endl> <tag ref="my-tag" max="unbounded"/> </keyword> </tag> </cli> |
Example 12. Syntax tags - (ab)* patterns
,-> | | | `-- |
<?xml version="1.0" encoding="utf-8"?>
<cli xmlns="http://alexis.royer.free.fr/CLI" name="(ab)*">
 <tag id="my-tag">
  <endl></endl>
  <keyword string="a">
   <keyword string="b">
    <tag ref="my-tag" max="unbounded"/>
   </keyword>
  </keyword>
 </tag>
</cli>
|
Example 13. Syntax tags - (ab)+ patterns
,-> | | | `-- |
<?xml version="1.0" encoding="utf-8"?>
<cli xmlns="http://alexis.royer.free.fr/CLI" name="(ab)+">
 <tag id="my-tag">
  <keyword string="a">
   <keyword string="b">
    <endl></endl>
    <tag ref="my-tag" max="unbounded"/>
   </keyword>
  </keyword>
 </tag>
</cli>
|
Let me show you how to make a a(b1|b2|)c syntax pattern before a(b1|b2)c.
Example 14. Syntax tags - a(b1|b2|)c patterns
,-- | | +-- | `-> |
<?xml version="1.0" encoding="utf-8"?>
<cli xmlns="http://alexis.royer.free.fr/CLI" name="a(b1|b2|)c">
 <keyword string="a">
  <keyword string="b1">
   <tag ref="my-tag"/>
  </keyword>
  <keyword string="b2">
   <tag ref="my-tag"/>
  </keyword>
  <tag id="my-tag">
   <keyword string="c">
    <endl></endl>
   </keyword>
  </tag>
 </keyword>
</cli>
|
Now, in order to forbid the CLI to go directly from keyword a
to tag my-tag,
just add a hollow attribute
with a yes value.
Example 15. Syntax tags - a(b1|b2)c patterns
,-- | | +-- | `-> |
<?xml version="1.0" encoding="utf-8"?>
<cli xmlns="http://alexis.royer.free.fr/CLI" name="a(b1|b2)c">
 <keyword string="a">
  <keyword string="b1">
   <tag ref="my-tag"/>
  </keyword>
  <keyword string="b2">
   <tag ref="my-tag"/>
  </keyword>
  <tag id="my-tag" hollow="yes">
   <keyword string="c">
    <endl></endl>
   </keyword>
  </tag>
 </keyword>
</cli>
|
Now let us combine | and * patterns.
Example 16. Syntax tags - (a|b)* patterns
,---> | | | ,-- | | | | | +-- | | | `-> `---- |
<?xml version="1.0" encoding="utf-8"?> <cli xmlns="http://alexis.royer.free.fr/CLI" name="(a|b)*"> <tag id="my-tag1"> <endl></endl> <keyword string="a"> <tag ref="my-tag2"/> </keyword> <keyword string="b"> <tag ref="my-tag2"/> </keyword> <tag id="my-tag2" hollow="yes"> <tag ref="my-tag1" max="unbounded"/> </tag> </tag> </cli> |
Example 17. Syntax tags - (a|b)+ patterns
,---> | | ,-- | | | | | +-- | | | `-> | `---- |
<?xml version="1.0" encoding="utf-8"?> <cli xmlns="http://alexis.royer.free.fr/CLI" name="(a|b)+"> <tag id="my-tag1"> <keyword string="a"> <tag ref="my-tag2"/> </keyword> <keyword string="b"> <tag ref="my-tag2"/> </keyword> <tag id="my-tag2" hollow="yes"> <endl></endl> <tag ref="my-tag1" max="unbounded"/> </tag> </tag> </cli> |
Note
This user guide has formerly proposed other directions for (a|b)+ and (a|b)* patterns. Since version 2.5, you are now advised to proceed as described above, so that automatic documentation generation works better (see Automatic documentation generation).
In lesser theoretical words, tag elements allow you to define command lines with options.
Example 18. Syntax tags - An optional command line
Consider the following object class:
class Circle {
public:
    Circle(void) : m_iX(0), m_iY(0), m_iR(1), m_ulColor(0) {}
    void SetXPosition(int X) { m_iX = X; }
    int GetXPosition(void) const { return m_iX; }
    void SetYPosition(int Y) { m_iY = Y; }
    int GetYPosition(void) const { return m_iY; }
    void SetRadius(int R) { m_iR = R; }
    int GetRadius(void) const { return m_iR; }
    void SetColor(unsigned long C) { m_ulColor = C; }
    unsigned long GetColor(void) const { return m_ulColor; }
private:
    int m_iX;
    int m_iY;
    int m_iR;
    unsigned long m_ulColor;
};
void Draw(const Circle& C) {}
or:
public class Circle {
    public Circle() { m_iX = 0; m_iY = 0; m_iR = 1; m_ulColor = 0; }
    public void setXPosition(int X) { m_iX = X; }
    public int getXPosition() { return m_iX; }
    public void setYPosition(int Y) { m_iY = Y; }
    public int getYPosition() { return m_iY; }
    public void setRadius(int R) { m_iR = R; }
    public int getRadius() { return m_iR; }
    public void setColor(long C) { m_ulColor = C; }
    public long getColor() { return m_ulColor; }
    public void draw() {}

    private int m_iX;
    private int m_iY;
    private int m_iR;
    private long m_ulColor;
}
Thanks to a tag, you can define an optional command line filling an object of this class:
,-> | | | | | | | | +-- | | | | | | +-- | | | | | | `-- |
<?xml version="1.0" encoding="utf-8"?>
<cli xmlns="http://alexis.royer.free.fr/CLI" name="Circle">
 <cpp option="include">#include "circle.h"</cpp>
 <keyword string="add">
  <keyword string="circle">
   <cpp>Circle c;</cpp>
   <java>Circle c = new Circle();</java>
   <tag id="circle">
    <endl>
     <cpp>Draw(c);</cpp>
     <java>c.draw();</java>
    </endl>
    <keyword string="x_position">
     <param type="int" id="X">
      <cpp>c.SetXPosition(<value-of param="X"/>);</cpp>
      <java>c.setXPosition(<value-of param="X"/>);</java>
      <tag ref="circle" max="1"/>
     </param>
    </keyword>
    <keyword string="y_position">
     <param type="int" id="Y">
      <cpp>c.SetYPosition(<value-of param="Y"/>);</cpp>
      <java>c.setYPosition(<value-of param="Y"/>);</java>
      <tag ref="circle" max="1"/>
     </param>
    </keyword>
    <keyword string="radius">
     <param type="int" id="R">
      <cpp>c.SetRadius(<value-of param="R"/>);</cpp>
      <java>c.setRadius(<value-of param="R"/>);</java>
      <tag ref="circle" max="1"/>
     </param>
    </keyword>
   </tag>
  </keyword>
 </keyword>
</cli>
|
(1) (2) (3) (3) (3) |
- Declare an object with optional values.
- Valid the object with its current values.
- Set optional values.
This example accepts the following command lines:
add circle
add circle x_position 1
add circle y_position 2
add circle radius 2
add circle x_position -1 y_position -1 radius 3
...
Example 19. Syntax tags - Another optional command line
If you want parameters to be ordered, you could use the following pattern.
,-- | | | | +-- | | | | +-- | | | | +-- | `-> |
<?xml version="1.0" encoding="utf-8"?>
<cli xmlns="http://alexis.royer.free.fr/CLI" name="Circle">
 <cpp option="include">#include "circle.h"</cpp>
 <keyword string="add">
  <keyword string="circle">
   <cpp>Circle c;</cpp>
   <java>Circle c = new Circle();</java>
   <keyword string="black">
    <cpp>c.SetColor(0x000000);</cpp>
    <java>c.setColor(0x000000);</java>
    <tag ref="draw-circle"/>
   </keyword>
   <keyword string="blue">
    <cpp>c.SetColor(0x00ff00);</cpp>
    <java>c.setColor(0x00ff00);</java>
    <tag ref="draw-circle"/>
   </keyword>
   <keyword string="red">
    <cpp>c.SetColor(0xff0000);</cpp>
    <java>c.setColor(0xff0000);</java>
    <tag ref="draw-circle"/>
   </keyword>
   <keyword string="green">
    <cpp>c.SetColor(0x0000ff);</cpp>
    <java>c.setColor(0x0000ff);</java>
    <tag ref="draw-circle"/>
   </keyword>
   <tag id="draw-circle" hollow="yes">
    <endl>
     <cpp>Draw(c);</cpp>
     <java>c.draw();</java>
    </endl>
   </tag>
  </keyword>
 </keyword>
</cli>
|
(1) (2) (2) (2) (2) (3) |
- Declare an object with optional values.
- Set the color: either black, blue, red or green.
- Draw the circle with its color.
This example accepts the following command lines:
add circle black
add circle blue
add circle red
add circle green
Note
Themax attribute of tag elements have been introduced in version 2.5.
The CLI library does not implement it at present.
It is only managed by the automatic documentation generation (see Automatic documentation generation),
and should be implemented for real in latter versions of the library.
This attribute may receive the 1 or the unbounded value.
It indicates the maximum number of times this tag link can be followed syntaxically speaking.
All theoretical examples presented the unbounded value,
the example below presents a regular use of the 1 value.
Note
The CLI transformation is quite permissive regarding tags. There is no special restriction on whether you can reference a tag from anywhere in the syntax tree or not. However, the target language compiler or interpreter shall detecte non-sense situations afterwards.Good! Now tell me. I have plenty of commands and I don't know how to organize my work. I could describe them with few keywords for each of them, but I'm afraid of having a wide choice at the root. So I've though about gathering sets of commands behind first keywords. What do you think about that?
You're right! That's a possibility. But hold on! What you are looking for is probably menus.
The cli element basically implements the main menu of a CLI interface.
You may also define sub-menus, gathering sets of commands under a common topic by the way.
Menus are then accessed through command lines.
A menu element with a name attribute defines a new menu.
Inside, you can declare new command lines, as you would proceed in the cli element.
This menu element can be placed:
- in a
endlelement. The menu is directly available from the command it is attached to. - in the
clielement. The menu is then referenced thanks tomenuelements with arefattribute inendlelements.
It is now time to introduce the pwm command. If you have tried any example of this user guide, you may have noticed a basic command pwm meaning Print Working Menu. The same way pwd gives you the working directory in a UNIX shells, this command gives you the current working menu, and the current stack of menus.
Example 20. Classify user-defined command lines in menus
- The edit config command leads to a
editsub-menu, thanks to themenuelement directly contained in theendlelement. - The commands defined from the
editsub-menu are available only once the edit config has been entered. - No need to define basic commands for menus. The pwm behaves as usual. The exit command allows the user to quit the current menu and come back to the parent one. The quit command directly quits the CLI.
<?xml version="1.0" encoding="utf-8"?>
<cli xmlns="http://alexis.royer.free.fr/CLI" name="my-config">
 <keyword string="show">
  <keyword string="ip">
   <keyword string="config">
    <endl></endl>
   </keyword>
   <keyword string="stats">
    <endl></endl>
   </keyword>
  </keyword>
 </keyword>
 <keyword string="edit">
  <keyword string="config">
   <endl>
    <menu name="edit">
     <keyword string="set">
      <keyword string="ip">
       <keyword string="address">
        <param type="host" id="addr">
         <endl></endl>
        </param>
       </keyword>
      </keyword>
     </keyword>
     <keyword string="reset">
      <keyword string="stats">
       <endl></endl>
      </keyword>
     </keyword>
    </menu>
   </endl>
  </keyword>
 </keyword>
</cli>
|
(1) (1) (3) (2) (2) |
Note
Advanced menu features are discussed in the advanced section. Please refer to the Advanced menu management section for more information.I can define my own command lines, organize them in menus. Pretty well! Now, how can I handle comment lines? Should I define something like a dummy command line for that?
Could be, but a dedicated comment line pattern feature has been designed for that purpose, which makes it easier and smarter by the way.
In addition to regular command lines, defined as sequences of keywords and parameters, the XML resource file provides a way to easily define comment line patterns.
Note
This feature has been added in the version 2.9 of the CLI toolkit.Example 21. Define comment line patterns
Comment line patterns are defined through comment elements directly within the cli root node.
This example defines three comment line patterns: lines starting with '#', '//' or '--' will be interpreted as comment lines.
<?xml version="1.0" encoding="utf-8"?>
<cli xmlns="http://alexis.royer.free.fr/CLI" name="Comments">
 <!-- Comment line patterns -->
 <comment start="#"/>
 <comment start="//"/>
 <comment start="--"/>
 <!-- Regular command lines -->
 <keyword string="hello"><help lang="en">Say hello to somebody</help>
  <param type="string" id="who"><help lang="en">Somebody's name</help>
   <endl></endl>
  </param>
 </keyword>
</cli>
In as much as these patterns are applicable to all the menus and sub-menus of the CLI, they are reminded to the user in the beginning of the help message of any menu:
Comments>help
  Start with '#', '//' or '--' for a comment line
  cls             Clean screen
  exit            Exit menu 'Comments'
  hello           Say hello to somebody
  help            Get help
  pwm             Print Working Menu
  quit            Quit
Comments>
Comment line patterns apply before the syntax analysis of the command line: if the command line is recognized as a comment, the syntax analysis is not executed. The comment line appears in the history the same as regular command lines do.
Thank you for this detailed documentation. Do you provide a schema in order to check automatically this XML resource syntax?
This toolkit is provided with two schema files: cli.xsd and cli.rng.
cli.xsd is a regular W3C Xml Schema 1.0 file.
Because of W3C limitations, some constraints are not checked with this Xml Schema:
menu[@name]/menu[@ref]andtag[@id]/tag[@ref]elements distinction,menuandtagforeign key constraints.
However cli.xsd can be used in order to have a first level of syntax checking.
Example 22. Xml Schema validation
$ xmllint --schema ${CLI_DIR}/tools/cli.xsd --noout my-cli.xml
my-cli.xml validates
cli.rng is a Relax NG schema.
Relax NG permits the description of elements having the same name but different attributes,
however it still does not cover all the constraints that should be checked:
menunames andtagidentifiers unicity,menuandtagforeign key constraints.
But once again, cli.rng can be used in order to have a first level of syntax checking.
Example 23. Relax NG validation
$ xmllint --relaxng ${CLI_DIR}/tools/cli.rng --noout --noout my-cli.xml
my-cli.xml validates
Great! Now I just have to document the CLI for my users.
Automatic documentation generation may do part of the job for you then.
Since version 2.5, the CLI toolkit is provided with scripts that generate CLI documentation automatically.
Note
This documentation generation was originally processed thanks to acli2help.xsl XSLT stylesheet.
However, in as much as the python script equivalent introduced in version 2.8 works better and faster,
this original XSLT stylesheet is still provided within the ${CLI_DIR}/tools/ directory, but is now declared deprecated since version 2.9.
Example 24. cli2help.py automatic documentation generation
python ${CLI_DIR}/tools/cli2help.py clisample.xml --output clisample.html
The python tool comes with a --help option:
$ python ${CLI_DIR}/tools/cli2help.py --help
usage: cli2help [-h] [--version] [--lang LANG] [--toc | --no-toc]
                [--title-numbers | --no-title-numbers] [--output OUTPUT]
                xml-res

positional arguments:
  xml-res             CLI XML resource file

optional arguments:
  -h, --help          show this help message and exit
  --version           show program's version number and exit
  --lang LANG         Language ('en', 'fr'...).
  --toc               Generate table of content.
  --no-toc            Do not generate table of content.
  --title-numbers     Generate titles with their number.
  --no-title-numbers  Generate titles with no number.
  --output OUTPUT     Output file (by default the result is printed out in the
                      standard output)
This documentation generation is not as clever as a human being, therefore here is a couple of directions in order to generate a smart documentation:
- The documentation generation consider backward and forward tags.
Backward tags basically implement non mandatory options, and are presented [this way].
Forward tags implement mandatory options following a(b1|b2)c patterns.
- Avoid exotic tag nesting, in order to let the tools have a simple understanding of the organization of the options.
Please refer to the
tagsection for the implementation of such regular patterns.
- Avoid exotic tag nesting, in order to let the tools have a simple understanding of the organization of the options.
Please refer to the
- Commands are found back, being processed backwardly, from their
endlfinal elements.- Check the number of
endlelements you declare for a single human-understandable command. Let's consider two command lines say hello and say bye, they may be considered like two different command lines, or rather like a single one with a mandatory parameter say (hello|bye). It's up to you to choose which presentation is better, and usetagelements when needed. - Some commands are documented with
helpelements for each syntax node, but the final syntax node help may be not enough representative for a user documentation. In such a situation, use a dummy tag at the end of the command line, in order to force the help for a given command. Dummy tags aretagelements with aidattribute, but no reference from the rest of the CLI XML resource file. Dummy tags can be documented withhelpelements as well, but this help has no effect during the CLI execution.
- Check the number of
Very good. Now I'm getting back to making the user enter data out of command line editions. You told me we would deal with it?
Here we go!
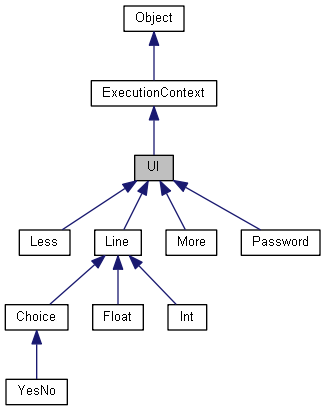
The CLI library also provides a set of classes that helps displaying long texts or making the user enter additional data. These classes are scoped in a ui namespace.
Please note!
The examples in this section are given in the context of a blocking execution integration.
If you integrate the CLI library in the non-blocking execution mode,
such as the TelnetServer class provided with the library does,
you should read through the Non-blocking execution and UI controls example.
Make the user enter a single text line on request, with regular text edition facilities:
- left and right arrows,
- HOME and END keys,
- backward and forward deletion,
- insert and replace modes,
plus other features:
- default answer,
- min / max string length constraints...
Check C++ doxygen
or javadoc documentations
for details on programming interfaces.
Example 25. UI controls - ui.Line
<?xml version="1.0" encoding="utf-8"?>
<cli xmlns="http://alexis.royer.free.fr/CLI" name="UI">
 <cpp option="include">#include "cli/ui_line.h"</cpp>
 <keyword string="enter">
  <keyword string="line">
   <endl>
    <!-- Note: blocking execution integration only! -->
    <!-- C++ implementation -->
    <cpp><out/> << "Enter line: ";</cpp>
    <cpp>cli::ui::Line ui_Line(GetShell(), cli::tk::String(10, ""), 0, 1024);</cpp>
    <cpp>ui_Line.Run();</cpp>
    <cpp><out/> << "User entered '" << ui_Line.GetLine() << "'" << cli::endl;</cpp>
    <!-- Java implementation -->
    <java><out/>.put("Enter line: ");</java>
    <java>cli.ui.Line ui_Line = new cli.ui.Line(getShell(), "", 0, 1024);</java>
    <java>ui_Line.run();</java>
    <java><out/>.put("User entered '" + ui_Line.getLine() + "'").endl();</java>
   </endl>
  </keyword>
 </keyword>
</cli>
The code above produces the following output:
UI>enter line
Enter line: Hello world
User entered 'Hello world'
UI>
Same as above, but without displaying the text. Either nothing is displayed or only stars.
Check C++ doxygen
or javadoc documentations
for details on programming interfaces.
Example 26. UI controls - ui.Password
<?xml version="1.0" encoding="utf-8"?>
<cli xmlns="http://alexis.royer.free.fr/CLI" name="UI">
 <cpp option="include">#include "cli/ui_password.h"</cpp>
 <keyword string="enter">
  <keyword string="password">
   <endl>
    <!-- Note: blocking execution integration only! -->
    <!-- C++ implementation -->
    <cpp><out/> << "Enter password: ";</cpp>
    <cpp>cli::ui::Password ui_Password(GetShell(), true, 0, 1024);</cpp>
    <cpp>ui_Password.Run();</cpp>
    <cpp><out/> << "User entered '" << ui_Password.GetPassword() << "'" << cli::endl;</cpp>
    <!-- Java implementation -->
    <java><out/>.put("Enter password: ");</java>
    <java>cli.ui.Password ui_Password = new cli.ui.Password(getShell(), true, 0, 1024);</java>
    <java>ui_Password.run();</java>
    <java><out/>.put("User entered '" + ui_Password.getPassword() + "'").endl();</java>
   </endl>
  </keyword>
 </keyword>
</cli>
The code above produces the following output:
UI>enter password
Enter password: *****
User entered 'hello'
UI>
Let the user enter an integer number.
The Int class provides default value, plus min and max checkers.
Check C++ doxygen
or javadoc documentations
for details on programming interfaces.
Example 27. UI controls - ui.Int
<?xml version="1.0" encoding="utf-8"?>
<cli xmlns="http://alexis.royer.free.fr/CLI" name="UI">
 <cpp option="include">#include "cli/ui_int.h"</cpp>
 <keyword string="enter">
  <keyword string="int">
   <endl>
    <!-- Note: blocking execution integration only! -->
    <!-- C++ implementation -->
    <cpp><out/> << "Enter integer number: ";</cpp>
    <cpp>cli::ui::Int ui_Int(GetShell(), 0, -1000, 1000);</cpp>
    <cpp>ui_Int.Run();</cpp>
    <cpp><out/> << "User entered " << ui_Int.GetInt() << cli::endl;</cpp>
    <!-- Java implementation -->
    <java><out/>.put("Enter integer number: ");</java>
    <java>cli.ui.Int ui_Int = new cli.ui.Int(getShell(), 0, -1000, 1000);</java>
    <java>ui_Int.run();</java>
    <java><out/>.put("User entered " + ui_Int.getInt()).endl();</java>
   </endl>
  </keyword>
 </keyword>
</cli>
The code above produces the following output:
UI>enter int
Enter integer number: 107
User entered 107
UI>
Let the user enter a floating point number.
The Float class provides default value, plus min and max checkers.
Check C++ doxygen
or javadoc documentations
for details on programming interfaces.
Example 28. UI controls - ui.Float
<?xml version="1.0" encoding="utf-8"?>
<cli xmlns="http://alexis.royer.free.fr/CLI" name="UI">
 <cpp option="include">#include "cli/ui_float.h"</cpp>
 <keyword string="enter">
  <keyword string="float">
   <endl>
    <!-- Note: blocking execution integration only! -->
    <!-- C++ implementation -->
    <cpp><out/> << "Enter floating point number: ";</cpp>
    <cpp>cli::ui::Float ui_Float(GetShell(), 0, - 1000.0, 1000.0);</cpp>
    <cpp>ui_Float.Run();</cpp>
    <cpp><out/> << "User entered " << ui_Float.GetFloat() << cli::endl;</cpp>
    <!-- Java implementation -->
    <java><out/>.put("Enter floating point number: ");</java>
    <java>cli.ui.Float ui_Float = new cli.ui.Float(getShell(), 0, -1000.0, 1000.0);</java>
    <java>ui_Float.run();</java>
    <java><out/>.put("User entered " + ui_Float.getFloat()).endl();</java>
   </endl>
  </keyword>
 </keyword>
</cli>
The code above produces the following output:
UI>enter float
Enter floating point number: -3.14
User entered -3.14
UI>
Let the user answer "yes/no" questions. "Yes/no" questions are nothing but multiple choice questions with "yes" or "no" for choices.
Check C++ doxygen
or javadoc documentations
for details on programming interfaces.
Example 29. UI controls - ui.YesNo
<?xml version="1.0" encoding="utf-8"?>
<cli xmlns="http://alexis.royer.free.fr/CLI" name="UI">
 <cpp option="include">#include "cli/ui_yesno.h"</cpp>
 <keyword string="enter">
  <keyword string="yesno">
   <endl>
    <!-- Note: blocking execution integration only! -->
    <!-- C++ implementation -->
    <cpp><out/> << "Please select [YES/no]: ";</cpp>
    <cpp>cli::ui::YesNo ui_YesNo(GetShell(), true);</cpp>
    <cpp>ui_YesNo.Run();</cpp>
    <cpp><out/> << "User entered " << (ui_YesNo.GetYesNo() ? "true" : "false") << "/'" << ui_YesNo.GetstrChoice().GetString(GetShell().GetLang()) << "'" << cli::endl;</cpp>
    <!-- Java implementation -->
    <java><out/>.put("Please select [YES/no]: ");</java>
    <java>cli.ui.YesNo ui_YesNo = new cli.ui.YesNo(getShell(), true);</java>
    <java>ui_YesNo.run();</java>
    <java><out/>.put("User entered " + ui_YesNo.getYesNo() + "/'" + ui_YesNo.getstrChoice().getString(getShell().getLang()) + "'").endl();</java>
   </endl>
  </keyword>
 </keyword>
</cli>
The code above produces the following output:
UI>enter yesno
Please select [YES/no]: No
User entered false/'No'
UI>
Let the user answer multiple choice questions. Either the user types directly the choice himself/herself (auto-completion is provided), or he/she can use UP and DOWN keys to move from one choice to the other.
Check C++ doxygen
or javadoc documentations
for details on programming interfaces.
Example 30. UI controls - ui.Choice
<?xml version="1.0" encoding="utf-8"?>
<cli xmlns="http://alexis.royer.free.fr/CLI" name="UI">
 <cpp option="include">#include "cli/ui_choice.h"</cpp>
 <cpp option="include">#include "cli/string_device.h"</cpp>
 <keyword string="enter">
  <keyword string="choice">
   <param type="int" id="count">
    <endl>
     <!-- Note: blocking execution integration only! -->
     <!-- C++ implementation -->
     <cpp><out/> << "Select choice: ";</cpp>
     <cpp>cli::tk::Queue<cli::ResourceString> tk_Choices(<value-of param="count"/>);</cpp>
     <cpp>for (int i=0; i<<value-of param="count"/>; i++) {</cpp>
     <cpp>    cli::StringDevice cli_Choice(1024, false); cli_Choice << "Choice#" << (i + 1);</cpp>
     <cpp>    tk_Choices.AddTail(cli::ResourceString().SetString(cli::ResourceString::LANG_EN, cli_Choice.GetString()));</cpp>
     <cpp>}</cpp>
     <cpp>cli::ui::Choice ui_Choice(GetShell(), 0, tk_Choices);</cpp>
     <cpp>ui_Choice.Run();</cpp>
     <cpp><out/> << "User entered " << ui_Choice.GetChoice() << "/'" << ui_Choice.GetstrChoice().GetString(GetShell().GetLang()) << "'" << cli::endl;</cpp>
     <!-- Java implementation -->
     <java><out/>.put("Select choice: ");</java>
     <java>java.util.Vector<cli.ResourceString> j_Choices = new java.util.Vector<cli.ResourceString>();</java>
     <java>for (int i=0; i<<value-of param="count"/>; i++) {</java>
     <java>    j_Choices.add(new cli.ResourceString().setString(cli.ResourceString.LANG_EN, "Choice#" + (i + 1)));</java>
     <java>}</java>
     <java>cli.ui.Choice ui_Choice = new cli.ui.Choice(getShell(), 0, j_Choices);</java>
     <java>ui_Choice.run();</java>
     <java><out/>.put("User entered " + ui_Choice.getChoice() + "/'" + ui_Choice.getstrChoice().getString(getShell().getLang()) + "'").endl();</java>
    </endl>
   </param>
  </keyword>
 </keyword>
</cli>
The code above produces the following output:
UI>enter choice 10
Select choice: Choice#6
User entered 5/'Choice#6'
UI>
Display long text, page by page, as a regular "more" display:
- the display stops when the text is more than one page long,
- pressing ENTER moves the display one line forward,
- pressing the SPACE bar moves the display one page forward,
- pressing the 'q' key makes the display stop and get back to the regular CLI.
Check C++ doxygen
or javadoc documentations
for details on programming interfaces.
Basically, the text is prepared in the OutputDevice text member,
then the More execution is invoked for text display.
Example 31. UI controls - ui.More
static void FillText(const cli::OutputDevice& CLI_UI, const unsigned int UI_Count) {
    for (unsigned int i=1; (i<=UI_Count) && (i<1024); i++) {
        CLI_UI << i << ": ";
        for (unsigned int j=1; j<=i; j++) CLI_UI << "*";
        CLI_UI << cli::endl;
    }
}
Java code:
public class UISampleText {
    public static void fillText(cli.OutputDevice.Interface CLI_UI, int I_Count) {
        for (int i=1; (i<=I_Count) && (i<1024); i++) {
            CLI_UI.put(i + ": ");
            for (int j=1; j<=i; j++) CLI_UI.put("*");
            CLI_UI.endl();
        }
    }
}
CLI XML resource file:
<?xml version="1.0" encoding="utf-8"?>
<cli xmlns="http://alexis.royer.free.fr/CLI" name="UI">
 <cpp option="include">#include "cli/ui_more.h"</cpp>
 <cpp option="include">#include "ui_sample_text.h"</cpp>
 <keyword string="more">
  <param type="int" id="count">
   <endl>
    <!-- C++ implementation -->
    <cpp>cli::ui::More ui_More(GetShell(), 1024, <value-of param="count"/>);</cpp>
    <cpp>FillText(ui_More.GetText(), <value-of param="count"/>);</cpp>
    <cpp>ui_More.Run();</cpp>
    <!-- Java implementation -->
    <java>cli.ui.More ui_More = new cli.ui.More(getShell());</java>
    <java>UISampleText.fillText(ui_More.getText(), <value-of param="count"/>);</java>
    <java>ui_More.run();</java>
   </endl>
  </param>
 </keyword>
</cli>
The code above produces the following output:
UI>more 100
1: *
2: **
3: ***
4: ****
5: *****
6: ******
7: *******
8: ********
9: *********
10: **********
11: ***********
12: ************
13: *************
14: **************
15: ***************
16: ****************
17: *****************
18: ******************
19: *******************
--- More ---
Pressing ENTER discards the wait message, displays one more line, and eventually prints out the wait message again:
20: ********************
--- More ---
Pressing the SPACE bar discards the wait message, displays one more page, and eventually prints out the wait message again:
21: *********************
22: **********************
23: ***********************
24: ************************
25: *************************
26: **************************
27: ***************************
28: ****************************
29: *****************************
30: ******************************
31: *******************************
32: ********************************
33: *********************************
34: **********************************
35: ***********************************
36: ************************************
37: *************************************
38: **************************************
39: ***************************************
--- More ---
Pressing the 'q' key discards the wait message and gets the user back to the regular CLI execution:
UI>
Note
The size of the page is determined from screen characteristics. Please refer to the apropriate section if you implement your own input/output device.Display long text, page by page, as a regular "less" display:
- the display stops when the text is more than one page long,
- pressing the PAGE UP key moves the display one page backward,
- pressing the UP key moves the display one line backward,
- pressing ENTER or the DOWN key moves the display one line forward,
- pressing the SPACE bar or the PAGE DOWN key moves the display one page forward,
- pressing the 'q' key makes the display stop and get back to the regular CLI.
Check C++ doxygen
or javadoc documentations
for details on programming interfaces.
A Less object is prepared the same as a More object (see previous section).
Example 32. UI controls - ui.Less
<?xml version="1.0" encoding="utf-8"?>
<cli xmlns="http://alexis.royer.free.fr/CLI" name="UI">
 <cpp option="include">#include "cli/ui_less.h"</cpp>
 <cpp option="include">#include "ui_sample_text.h"</cpp>
 <keyword string="less">
  <param type="int" id="count">
   <endl>
    <!-- C++ implementation -->
    <cpp>cli::ui::Less ui_Less(GetShell(), 80, <value-of param="count"/>);</cpp>
    <cpp>FillText(ui_Less.GetText(), <value-of param="count"/>);</cpp>
    <cpp>ui_Less.Run();</cpp>
    <!-- Java implementation -->
    <java>cli.ui.Less ui_Less = new cli.ui.Less(getShell());</java>
    <java>UISampleText.fillText(ui_Less.getText(), <value-of param="count"/>);</java>
    <java>ui_Less.run();</java>
   </endl>
  </param>
 </keyword>
</cli>
The code above produces the following output:
UI>less 100
1: *
2: **
3: ***
4: ****
5: *****
6: ******
7: *******
8: ********
9: *********
10: **********
11: ***********
12: ************
13: *************
14: **************
15: ***************
16: ****************
17: *****************
18: ******************
19: *******************
:
Pressing ENTER cleans the screen and prints it again, one line forward:
2: **
3: ***
4: ****
5: *****
6: ******
7: *******
8: ********
9: *********
10: **********
11: ***********
12: ************
13: *************
14: **************
15: ***************
16: ****************
17: *****************
18: ******************
19: *******************
20: ********************
:
Pressing the 'q' key discards the wait message and gets the user back to the regular CLI execution:
UI>
Note
As for a "more" display, the size of the page is determined from screen characteristics.Note
Please note thatLess display also depends on the implementation of the "clean screen" feature.
If cleaning the screen is nothing but the default implementation (a couple of blank lines printed out),
a simple More display may be preferable then.
Therefore, it might be a good idea to check the screen implements a "true" "clean screen" feature
(see doxygen
or javadoc)
before using a Less object.
If the current output device does not implement an efficient "clean screen" feature, then you shall use a More object instead.
Well! So far, I think I can do almost everything whith XML resource files and UI classes. I'll manage with it now.
So good luck. Wish you lots of fun.
Some of you may have special needs. Here is some additional information for advanced users.
Many topics are illustrated either with C++ code or Java code, but please note that they are generally applicable to both languages: just transpose the C++/Java class names to the corresponding Java/C++ classes.
Let's start with telnet implementation.
The CLI library provides TelnetServer and TelnetConnection classes.
These classes allow you to easily make your CLI run with network connections.
Example 33. Simple telnet server
First of all, inherit from TelnetServer.
All you have to do is to override
onNewConnection to allocate resources for new network connections,
and onCloseConnection to free them when the thing is done.
class MyServer extends cli.TelnetServer {
    public MyServer() {
        // Up to 10 clients on port 9012.
        super(10, 9012, cli.ResourceString.LANG_EN);
    }
    protected cli.ExecutionContext.Interface onNewConnection(cli.TelnetConnection CLI_NewConnection) {
        // Create CLI and Shell instances for that new connection.
        cli.Cli cli_Cli = new MyCli();
        cli.Shell cli_Shell = new cli.Shell(cli_Cli);
        return cli_Shell;
    }
    protected void onCloseConnection(cli.TelnetConnection CLI_ConnectionClosed, cli.ExecutionContext.Interface CLI_Context) {
        // Free connection resources: the garbage collector does the thing for us in Java.
        // Note: CLI_Context corresponds to the cli.Shell instance we have created in onNewConnection().
    }
}
Eventually call startServer and that's it.
MyServer cli_Server = new MyServer();
cli_Server.startServer(); // Blocking call
Note
The TelnetServer and TelnetConnection interfaces have been modified in 2.7 and 2.8 consequent versions.
Sorry if those changes disturb integrations of some of your software with prior versions of the library,
but note that the motivation for those modifications is real improvements:
- CLI 2.7 improvements
- Redesign of
TelnetConnection, made as non-blocking for a better management of parallel connections. - Redesign of
TelnetServer, made virtual, so that the user software can create as many shells and clis for each connection.
- Redesign of
- CLI 2.8 improvements
- Redesign again of
TelnetServer, due to execution contexts improvements , so that the user software can create shells and clis, but also any other kind of execution contexts.
- Redesign again of
Start your server, and connect to it thanks to teraterm for instance:

Please note!
Even though the TelnetServer.startServer call is a blocking call,
the TelnetConnection class implies a non-blocking execution integration.
Should you be using UI controls,
please read through the Non-blocking execution and UI controls example.
menu elements may be provided with handler elements.
These handler elements allow you to trigger native code on certain events.
The CLI library manages three kinds of handlers:
errorerrorhandlers are available on the rootclielement, and are called when the CLI library displays an error. This can be useful when writing CLI-based compilers, trapping syntax errors by the way.errorhandlers return a boolean value:falsedisables the regular error display.exitexithandlers are called when the menu exits. When the CLI quits, the shell callsexithandlers for each menu in the current stack of menus.promptprompthandlers must return a string. They allow the user application to dynamically change the prompt for the menu, depending on the current state of the application. This can be useful when writing configuration menus, for several items, with the same set of commands. Instead of copy/paste the menu, just changing the name of it, for each item, you may use the same menu with aprompthandler.
Example 34. Menu handlers
- The main menu contains a
errorhandler. The code attached is called each time the CLI displays an error. The parameterslocationandmessageare provided and may be used. - Both menus contain a
exithandler. The code attached is called whenever the menus exit respectively. - Both menus contain a
prompthandler. The one for the main menu does nothing as far as it returns an empty string. The one for the sub-menu however changes the prompt of it, depending on themenu-idparameter value set previously.
<?xml version="1.0" encoding="utf-8"?>
<cli xmlns="http://alexis.royer.free.fr/CLI" name="menu-handler">
 <cpp option="include">#include "cli/string_device.h"</cpp>
 <cpp option="head">static int MenuId = 0;</cpp>
 <java option="import">class Global { public static int menuId = 0; }</java>
 <keyword string="menu">
  <param id="menu-id" type="int">
   <endl>
    <cpp>MenuId = <value-of param="menu-id"/>;</cpp>
    <java>Global.menuId = <value-of param="menu-id"/>;</java>


    <menu name="menu#">
     <handler name="exit">
      <cpp><out/> << "Leaving 'menu#" << MenuId << "' menu" << cli::endl;</cpp>
      <cpp>MenuId = 0;</cpp>
      <java><out/>.put("Leaving 'menu#" + Global.menuId + "' menu").endl();</java>
      <java>Global.menuId = 0;</java>
     </handler>
     <handler name="prompt">
      <cpp>cli::StringDevice s(20, false);</cpp>
      <cpp>s << "menu#" << MenuId;</cpp>
      <cpp>return s.GetString();</cpp>
      <java>return ("menu#" + Global.menuId);</java>
     </handler>
    </menu>
   </endl>
  </param>
 </keyword>

 <handler name="error">
  <cpp><out/> << "Error detected: ";</cpp>
  <cpp><out/> << "location = " << location.GetString(GetShell().GetLang()) << ", ";</cpp>
  <cpp><out/> << "message = " << message.GetString(GetShell().GetLang()) << cli::endl;</cpp>
  <cpp>return (MenuId == 0);</cpp>
  <java><out/>.put("Error detected: ");</java>
  <java><out/>.put("location = " + location.getString(getShell().getLang()) + ", ");</java>
  <java><out/>.put("message = " + message.getString(getShell().getLang())).endl();</java>
  <java>return (Global.menuId == 0);</java>
 </handler>
 <handler name="exit">
  <cpp><out/> << "Leaving 'menu-handler' menu" << cli::endl;</cpp>
  <java><out/>.put("Leaving 'menu-handler' menu").endl();</java>
 </handler>
 <handler name="prompt">
  <cpp>return cli::tk::String(0);</cpp>
  <java>return "";</java>
 </handler>
</cli>
|
(2) (3) (1) (2) (3) |
It is sometime useful to let the user application decide whether a menu should be entered or not.
Let's explain the need with an example.
Imagine the case of a command line leading to the configuration menu of network interfaces.
Such a command line would contain a string parameter so that the user can give the name of the network interface to configure.
When using a menu element,
the menu would automatically be entered,
even though we face a troublesome situation, such as a wrong interface name for instance.
However, basically, when the user types in a wrong interface name,
we would rather expect the application to print out an error message and not enter the configuration menu.
The example below explains how to implement such behaviour:
Example 35. Menu management from native code
menu element.
Native code methods are used instead:
- Depending on a condition, the C++
cli::Shell::EnterMenumethod is called. Thecli::Cli::GetMenumethod is used in order to retrieve the givencli::Menureference. - The same thing can be done for Java, thanks to the
cli.Shell.enterMenuandcli.Cli.getMenumethods. - An error message is displayed when the menu cannot be entered.
,-- | +-- | | | | | `-> |
<?xml version="1.0" encoding="utf-8"?>
<cli xmlns="http://alexis.royer.free.fr/CLI" name="menu-cpp">
 <keyword string="menu">
  <param id="menu-id" type="int">
   <endl>
    <cpp>if (<value-of param="menu-id"/> >= 0) { GetShell().EnterMenu(* GetCli().GetMenu("sub-menu"), false); }</cpp>
    <cpp>else { <err/> << "Invalid menu identifier " << <value-of param="menu-id"/> << cli::endl; }</cpp>
    <java>if (<value-of param="menu-id"/> >= 0) { getShell().enterMenu(getCli().getMenu("sub-menu"), false); }</java>
    <java>else { <err/>.put("Invalid menu identifier " + <value-of param="menu-id"/>).endl(); }</java>
   </endl>
  </param>
 </keyword>

 <menu name="sub-menu">
 </menu>
</cli>
|
(1) (3) (2) (3) |
The features described in the table below are available from native code. Please refer to doxygen or javadoc documentation for additional information.
Table 1. Shell advanced features
Note
You may notice that a couple of the features above are directly available from the baseExecutionContext,
and not only from the Shell class.
Indeed, the generic ExecutionContext class, new in version 2.8,
gathers many useful features, that were implemented in the Shell class in former versions,
but for any kind of execution context now.
The CLI library has an internal traces system. All traces are attached to a class of traces. By the way, you can control which traces have to be displayed thanks to the traces class filter. When compiled in debug, the CLI library natively includes a traces menu to see and change this filter.
The cli::Traces and cli::TraceClass classes
are defined in cli/traces.h, which is available to you.
The traces system can be accessed through the singleton cli::GetTraces.
This gives you the opportunity to use it to control the trace filter
through the cli::Traces::SetFilter and cli::Traces::SetAllFilter methods.
You may also use it for your own traces through the cli::Traces::Trace method.
cli::Traces uses an output device that defaults to stderr.
You may change this device through the cli::Traces::SetStream method,
and redirect traces to a file for instances.
Changing this device for the null device is a way to disable all traces.
Note
The io_device unit test gives an example of traces redirection to a file.
The CLI library has generic classes defining input/output device interfaces:
cli::OutputDevice, cli::IODevice and cli::NonBlockingIODevice.
The CLI library gives several implementations of these generic classes:

cli::Console- Console input/output device.
cli::InputFileDevice- Reading from a file can be useful for replaying scripts for instance.
cli::IOMux- Input and output can be multiplexed thanks to this class. More information is available in the corresponding section.
cli::SingleCommand- Single command device object. This device allows you define a single command line and have it executed.
cli::TelnetConnection- Telnet connection input/output device.
Note
The telnet protocol is not fully managed for the moment. Use simple TCP client connections for now with teraterm for instance. cli::OutputFileDevice- Redirect output to a file thanks to this device.
cli::StringDevice- Output to a string object. This device can be useful for unit-test among others.
You may need some support for other devices (such as RS232 for instance). Feel free to create new classes inheriting from generic input/output device interfaces, and implement what you need.
When inheriting from cli::OutputDevice, cli::IODevice or cli::NonBlockingIODevice,
the following handlers must/may be overridden:
Table 2. Output device handlers
See cli::OutputDevice for C++,
cli.OutputDevice.Java for Java.
| C++ | Java | Description | |
|---|---|---|---|
OpenDevice | openDevice | Mandatory |
Device opening handler. This is the place for device initializations. |
CloseDevice | closeDevice | Mandatory |
Device closure handler.
Free resources allocated in |
PutString | put | Mandatory |
Character output handler. NotePlease note the check io-device outputs command in the cli-config menu in debug mode. This commands tries to output every char from range 0 to 255. This routine may help you to integrate your output device implementation.NoteSince version 2.3, thecli::OutputDevice basic class does not manage an "end of line" pattern anymore.
It is up to the sub-classes to trap '\n' characters in the PutString handler,
and do the appropriate stuff at this time.
|
Beep | beep | Optional |
Beep handler. Default implementation outputs a '\a' character. |
CleanScreen | cleanScreen | Optional |
Clean screen handler. Default implementation prints out 50 blank lines. |
GetScreenInfo | getScreenInfo | Optional |
Screen information:
Default implementation indicates a 80x20 screen with no true "clean screen" feature nor line wrapping.
Thus, overriding this handler is optional, but you'd better do it,
especially if you intend to use |
WouldOutput | wouldOutput | Optional |
Stack overflow protection. Determines whether the current device would output the given device in any way. Default implementation checks whether CLI_Device is the self device.
If you implement output redirection, don't forget override and call the |
Table 3. Input device handlers
See cli::IODevice for C++,
cli.IODevice for Java.
| C++ | Java | Description | |
|---|---|---|---|
GetKey | getKey | Mandatory |
Input key capture handler (blocking call). Base implementation provides regular conversions from char to cli::KEY types. NotePlease note the check io-device command in the cli-config menu in debug mode. This command asks you to press each character managed by the library, in order to make a complete inventory. This routine, with the use of traces (see Traces), may help you to integrate your input device implementation. |
GetLocation | getLocation | Optional |
Input location. Return a text indicating where the location of the last character input. Useful when developing compiler applications. |
WouldInput | wouldInput | Optional |
Stack overflow protection. Determines whether the current device would input the given device in any way. Default implementation checks whether CLI_Device is the self device.
If you implement input redirection, don't forget override and call the |
Table 4. Non-blocking device handlers
See cli::NonBlockingIODevice for C++,
cli.NonBlockingIODevice for Java.
See also Non-blocking execution section for a specific explanation of non-blocking devices.
| C++ | Java | Description | |
|---|---|---|---|
OnKey | onKey | Optional |
Handler to call in order to push non-blocking keys for processing. |
Considering the input device could be not the same all along CLI execution, I have created an input / output multiplexer device. Thus, this kind of device allows you to mix several input devices and redirect outputs to other devices.
This device may seem complex at first. It can be useful however to create simple compilers as described in the section after.
The basic integration of the CLI is to have the shell running its main loop in the main thread,
waiting for the input device to return characters, thanks to the blocking call cli::IODevice::GetKey.
This method is fast, but not convenient in various situations:
- When the integration takes place in a mono-thread application (such as Windows MFC for instance). Such kind of applications is usually not designed to safely manage threading and access concurrency. Thus creating a thread for a blocking CLI to run in it is source of troubles.
- When the CLI needs to be stopped from external events. Unless you have developped your own input/output and made something special for that, pretty sure the CLI will be blocked waiting for a single character when you actually need to stop it.
That's the reason why a "non-blocking" execution mode has been developed.
It is available by simply giving a cli::NonBlockingIODevice input device to the shell for its execution.
It is up to you to:
- Inherit from this abstract class (see Define your own input/output device),
- Have your characters being trapped by the application,
- Push them to the shell thanks to the
cli::NonBlockingIODevice::OnKeymethod.
Example 36. Non-blocking execution
cli.Cli cli_Cli = new MyCli();
cli.Shell cli_Shell = new cli.Shell(cli_Cli);
MyNonBlockingIODevice cli_Device = new MyNonBlockingIODevice(); // extends cli.NonBlockingIODevice

// Since cli_Device is a non-blocking device, the following call does not block the execution thread.
cli_Shell.run(cli_Device);
// cli_Shell is still running at this point!

// Let's push characters...
cli_Device.onKey(cli.OutputDevice.KEY_q);
cli_Device.onKey(cli.OutputDevice.KEY_u);
cli_Device.onKey(cli.OutputDevice.KEY_i);
cli_Device.onKey(cli.OutputDevice.KEY_t);
cli_Device.onKey(cli.OutputDevice.ENTER);
// Since the 'quit' command has been pushed, cli_Shell is not running anymore at this point!
Regarding UI controls,
in non-blocking mode, you have to rely on the ExecutionResult interface in order to be notified when their execution is done
(see Execution contexts).
Example 37. Non-blocking execution and UI controls
final MyNonBlockingIODevice cli_Device = new MyNonBlockingIODevice(); // extends cli.NonBlockingIODevice
final cli.ui.Line ui_Line = new cli.ui.Line(cli_Shell, "", 0, 1024);
cli_Device.put("Enter line: ");
ui_Line.watchResult(
    new cli.ExecutionResult() {
        // This method will be called when the control is done
        protected void onResult(cli.ExecutionContext.Interface CLI_Context) {
            cli_Device.put("End of execution: ").put(ui_Line.getLine()).endl();
        }
    }
);
ui_Line.run();
cli_Device.onKey(cli.OutputDevice.KEY_h);
cli_Device.onKey(cli.OutputDevice.KEY_e);
cli_Device.onKey(cli.OutputDevice.KEY_l);
cli_Device.onKey(cli.OutputDevice.KEY_l);
cli_Device.onKey(cli.OutputDevice.KEY_o);
cli_Device.onKey(cli.OutputDevice.ENTER);
// "End of execution: hello" printed out there
Generic execution contexts have been added in version 2.8. They consist in something that manages:
- a set of input/output devices,
- settings: language, beep...,
- input character processing.
It basically corresponds to what the Shell does, but also UI controls,
and possibly something you could define for your own needs.
This feature is basically implemented with the ExecutionContext and ExecutionResult classes.
Input character processing is implemented through the ExecutionContext::Run method.
It may be either a blocking or a non-blocking call depending on the type of input/output device given.
The following flow chart illustrates how it works for a regular blocking call execution,
(i.e. when the input/output device is a direct IODevice-derived class):

As discussed in the Non-blocking execution section, it also supports non-blocking call executions
(i.e. when the input/output device is a NonBlockingIODevice).
In that case, the ExecutionResult allows one to retrieve execution results of ExecutionContext once they are done,
as shown in the Non-blocking execution and UI controls example.
The following flow chart illustrates a non-blocking call execution:
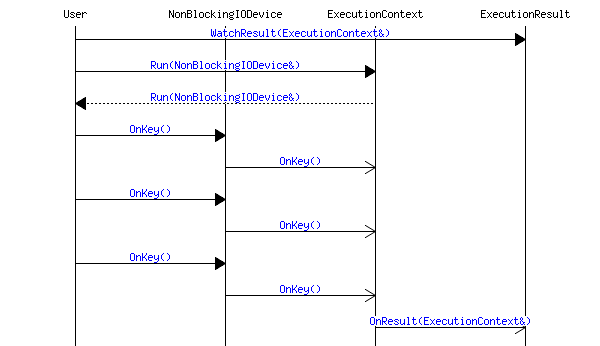
Execution contexts can be launched within the execution of another execution context.
UI controls basically run within the context of a Shell for example.
That's why we talk about top and child execution contexts.
Whether it is a top or child execution context depends on the constructor overload you call.
When no ExecutionContext reference is given for construction, this is a top execution context.
When a reference is given, this is a child execution context.
See the example below for a practical use case.
Example 38. PwdShellContext execution context
The CLI library does not intend to provide a fortified implementation for authentications.
That's the reason why no password is managed with the Shell class.
By the way, here is a PwdShellContext sample class
that chain a simple ui::Password execution with a Shell.
#include "cli/exec_context.h"
#include "cli/ui_password.h"
#include "cli/shell.h"

//! @brief Authentication for a shell access.
class PwdShellContext : public cli::ExecutionContext, public cli::ExecutionResult
{
public:
    //! @brief Constructor.
    PwdShellContext(const cli::Cli& CLI_Cli, const char* const STR_Pwd)
          : cli::ExecutionContext(),                                    // Create top execution context.
            m_tkPwd(256, STR_Pwd), m_uiPwdAttempsLeft(MAX_PWD_ATTEMPTS)
    {
        m_pcliPwd = new cli::ui::Password(*this, true, -1, -1);         // Create password child execution context.
        m_pcliShell = new cli::Shell(*this, CLI_Cli);                   // Create shell child execution context.
    }
    //! @brief Destructor.
    virtual ~PwdShellContext(void) {
        delete m_pcliPwd;
        delete m_pcliShell;
    }
public:
    //! @brief Password control accessor.
    cli::ui::Password& GetPwdControl(void) { return *m_pcliPwd; }
    //! @brief Shell accessor.
    cli::Shell& GetShell(void) { return *m_pcliShell; }
protected:
    //! @brief OnStartExecution(): start the password control.
    virtual const bool OnStartExecution(void) {
        GetStream(cli::OUTPUT_STREAM) << "Enter password: ";
        WatchResult(*m_pcliPwd);
        m_pcliPwd->Run();
        return true;
    }
    //! @brief Receives notifications when a child execution context is done.
    virtual void OnResult(const cli::ExecutionContext& CLI_ExecutionContext) {
        if (IsRunning()) {
            // When this is a notification from the password control...
            if (& CLI_ExecutionContext == m_pcliPwd) {
                if (m_pcliPwd->GetbExecResult()) {
                    if (m_uiPwdAttempsLeft > 0) {
                        // Decrement the password attempts left at first.
                        m_uiPwdAttempsLeft --;
                        if (m_pcliPwd->GetPassword() == m_tkPwd) {
                            // Password OK: restore the password attempts left and run the shell.
                            m_uiPwdAttempsLeft = MAX_PWD_ATTEMPTS;
                            WatchResult(*m_pcliShell);
                            m_pcliShell->Run();
                            return;
                        } else {
                            // Wrong password
                            if (m_pcliPwd->GetPassword().IsEmpty()) {
                                m_uiPwdAttempsLeft ++;
                            } else {
                                GetStream(cli::ERROR_STREAM) << "Wrong password!" << cli::endl;
                            }
                            if (m_uiPwdAttempsLeft > 0) {
                                // Let the user enter his password again.
                                PwdShellContext::OnStartExecution();
                                return;
                            }
                        }
                    }
                }
            }
            // Default behaviour.
            ExecutionContext::StopExecution();
        }
    }
    //! @brief OnStopExecution(): called when either the user has typed too many wrong passwords, or when the shell is done.. */
    virtual const bool OnStopExecution(void) { return true; }
    //! @brief OnKey(): should not happen.
    virtual void OnKey(const cli::KEY E_Key) {}
private:
    cli::ui::Password* m_pcliPwd;
    cli::Shell* m_pcliShell;
    cli::tk::String m_tkPwd;
    enum { MAX_PWD_ATTEMPTS = 3 };
    unsigned int m_uiPwdAttempsLeft;
};
Same thing in Java:
/** Authentication for a shell access. */
public class PwdShellContext extends cli.ExecutionContext.Java
{
    /** Constructor. */
    public PwdShellContext(cli.Cli CLI_Cli, String J_Pwd) {
        super();                                            // Create top execution context.
        m_jPwd = J_Pwd;
        m_cliPwd = new cli.ui.Password(this, true, -1, -1); // Create password child execution context.
        m_cliShell = new cli.Shell(this, CLI_Cli);          // Create shell child execution context.
        m_cliResult = new PwdShellResult();
        m_iPwdAttempsLeft = MAX_PWD_ATTEMPTS;
    }
    /** Password control accessor. */
    public cli.ui.Password getPwdControl() { return m_cliPwd; }
    /** Shell accessor. */
    public cli.Shell getShell() { return m_cliShell; }
    /** onStartExecution(): start the password control. */
    protected boolean onStartExecution() {
        getStream(cli.ExecutionContext.OUTPUT_STREAM).put("Enter password: ");
        m_cliResult.watchResult(m_cliPwd);
        m_cliPwd.run();
        return true;
    }
    /** onStopExecution(): called when either the user has typed too many wrong passwords, or when the shell is done.. */
    protected boolean onStopExecution() { return true; }
    /** onKey(): should not happen. */
    protected void onKey(int E_Key) {}

    /** Receives notifications when a child execution context is done. */
    private class PwdShellResult extends cli.ExecutionResult {
        protected void onResult(cli.ExecutionContext.Interface CLI_ExecutionContext) {
            if (isRunning()) {
                // When this is a notification from the password control...
                if (CLI_ExecutionContext == m_cliPwd) {
                    if (m_cliPwd.getbExecResult()) {
                        if (m_iPwdAttempsLeft > 0) {
                            // Decrement the password attempts left at first.
                            m_iPwdAttempsLeft --;
                            if (m_cliPwd.getPassword().equals(m_jPwd)) {
                                // Password OK: restore the password attempts left and run the shell.
                                m_iPwdAttempsLeft = MAX_PWD_ATTEMPTS;
                                m_cliResult.watchResult(m_cliShell);
                                m_cliShell.run();
                                return;
                            } else {
                                // Wrong password
                                if (m_cliPwd.getPassword().length() <= 0) {
                                    m_iPwdAttempsLeft ++;
                                } else {
                                    getStream(cli.ExecutionContext.ERROR_STREAM).put("Wrong password!").endl();
                                }
                                if (m_iPwdAttempsLeft > 0) {
                                    // Let the user enter his password again.
                                    onStartExecution();
                                    return;
                                }
                            }
                        }
                    }
                }
                // Default behaviour.
                stopExecution();
            }
        }
    }

    private final int MAX_PWD_ATTEMPTS = 3;
    private final String m_jPwd;
    private final cli.ui.Password m_cliPwd;
    private final cli.Shell m_cliShell;
    private final PwdShellResult m_cliResult;
    private int m_iPwdAttempsLeft;
}
When integrating the CLI in an embedded context, memory considerations become a critical point.
The library basically uses the STL library for strings, queues and maps basic objects.
But in an embedded integration, it is usually preferred not to use STL at all, because the memory is not known to be safely managed.
That's the reason why an inner toolkit implement is provided with the CLI library.
This toolkit, enabled through the CLI_NO_STL compilation directive,
provides an implementation of strings, queues and maps with a limit of memory extension.
Eventually, you may also have a look at the header file constraints.h.
This header defines a set of constants that are overridable at compile time.
C++ CLI is ready for pre-compiled headers. Every CLI source starts its inclusions with:
#include "cli/pch.h"
A default empty cli/pch.h is provided with C++ CLI includes,
so that builds work on even though pre-compiled headers are not set up.
I you wish to use pre-compiled headers, I advise you not to modify the header provided with the library.
Indeed, if you modify that header, then when you upgrade the CLI library with later versions, you may loose your changes by the way.
You'd better create your own cli/pch.h somewhere by your own sources,
and configure include paths so that your cli/pch.h file is included before the one provided by the library.
Then include cli/pch.h in your pre-compiled source object to finalize pre-compilation settings.
Note
As far as the CLI library in its default configuration uses the Standard Library headers, pre-compiled headers really fastens your builds.
The CLI library can be used to make out compilers of simple syntaxes.
I'm used to combine the cli::InputFileDevice class to read from files,
and the cli::IOMux class to read from a set of files one after the other.
The cli::InputFileDevice provides two methods very useful in that case:
EnableSpecialCharacters- Makes the
cli::InputFileDeviceobject enable or disable special characters reading. When the special characters are disabled, tabulations will be understood like spaces, interrogation dots will be escaped... which is more convenient for a compiler implementation. GetLocation- When an error occurs, this method can be called to retrieve the current position of reading in the input file.
Note
The Watch project does implement such kind of design.Some of you could find the library interesting for what it already implements, but not the XML resource file, too limitative maybe.
Indeed the XML resource file aims to facilitate and fasten the development. But you could plan using library objects directly, and maybe inherit from them in order to improve the stuff.
Well... Up to you!
tag elements allow you to reuse command line patterns within in a same command line,
but they do not work across different menus.
By the way, repeating a same set of commands in different menus is a regular expectation. You can use XML inclusions for that.
Example 39. XML inclusions: external entities
This example shows how to implement XML inclusions with external entities.
Define a top.xml cli XML file like this:
<?xml version="1.0" encoding="utf-8"?>
<!DOCTYPE cli [
 <!ENTITY child SYSTEM "child.xml">
]>
<cli xmlns="http://alexis.royer.free.fr/CLI" name="top">
 <keyword string="menu1">
  <endl>
   <menu name="menu1">
    &child;
   </menu>
  </endl>
 </keyword>
 <keyword string="menu2">
  <endl>
   <menu name="menu2">
    &child;
   </menu>
  </endl>
 </keyword>
</cli>
Define a child.xml cli XML file like this:
<?xml version="1.0" encoding="utf-8"?>
<keyword string="k1">
 <endl></endl>
</keyword>
Then build the full XML file with the following command:
xmllint --dropdtd --noent top.xml > full.xml
Example 40. XML inclusions: XInclude
This example shows how to implement XML inclusions with XInclude.
Define a top2.xml cli XML file like this:
<?xml version="1.0" encoding="utf-8"?>
<cli xmlns="http://alexis.royer.free.fr/CLI" name="top">
 <keyword string="menu1">
  <endl>
   <menu name="menu1">
    <xi:include xmlns:xi="http://www.w3.org/2001/XInclude" href="child.xml" parse="xml"/>
   </menu>
  </endl>
 </keyword>
 <keyword string="menu2">
  <endl>
   <menu name="menu2">
    <xi:include xmlns:xi="http://www.w3.org/2001/XInclude" href="child.xml" parse="xml"/>
   </menu>
  </endl>
 </keyword>
</cli>
Keep the same child.xml as for the previous example.
Then build the full XML file with the following command:
xmllint --xinclude top2.xml > full2.xml
The aim of this software is to ease the development of command line interfaces,
not to provided a high-security shell implementation.
That's the reason why the Shell class
does not provide a password authentication
nor a timeout feature.
It is up to you to implement such kind of functions, depending on your security requirements.
By the way, I advise you to read through the Execution contexts section,
and its PwdShellContext execution context example.
Also have a look at non-blocking devices,
in the Non-blocking execution section,
which are more suitable to implement timeout aspects.
If I had provided a general member for a context reference in Cli objects,
it would have been an opaque pointer of type void*, which I definitely dislike.
I prefer when objects are accessed through full type accessors, such as singletons, or register databases.
Or even better, you could make use of member code generation as described in the cpp, java
- Insert target language directly in the resource file section
in order to declare your own context reference, with getters and setters.
Please note at first that a bug around formatting pointer values has been fixed in version 2.8 in io_device.cpp.
Then, it seems there may be troubles around Java. Here is what Pete Geremia emailed to me after he managed to make it work on a 64 bit architecture (thank you Pete):
I basically added -m32 to c++ compile lines. There is also a requirement to point JAVA_HOME to a 32bit version of Java that is installed on a 64bit box. (in file cli/java/build/make/_vars.mak)
I also fixed some bugs where "jar" was called w/o $JAVA_HOME/bin/ in front of it. This actually caused me a problem because OpenJDK was installed on the box and jar was being used from that distribution.
Now, if you, guys, have some more info, please let me know.
Has far as CLI symbols are all scoped in a cli namespace, I have not specified them with redundant prefixes.
To my point of view, this is a smart way of organizing C++ code.
Therefore, the DELETE symbol is defined as an enum value in the scope of the cli namespace.
The compilation error with Visual C++ comes with an abusive VC++ DELETE define directive in Windows headers.
This define is useless in CLI sources, therefore I advise to use a cli/pch.h file
as described in the Pre-compiled headers section,
and undefine the DELETE symbol in it, after Windows inclusions:
#undef DELETE
First check you have installed the ncurses devel tools as described in section Prerequisite.
If you have already installed the ncurses devel tools, and still have the error,
check whether your curses.h header is located in your regular system include path (/usr/include in general).
You may notice that it is not exactly in this directory but maybe in a subdirectory.
I recently faced this problem with my latest Cygwin install.
You'd then set (or extend) your CPLUS_INCLUDE_PATH environment variable to the required directory,
as below for example:
export CPLUS_INCLUDE_PATH=/usr/include/ncurses
Then try to rebuild.
Indeed, C++ CLI auto-generated source files contain lots of labels and gotos. Not all of the labels defined are used with goto statements, which causes all those warnings with most of compilers.
You may have noticed the use of the g++ -Wno-unused-label option in the C++ integration section.
This option can be set specifically for the compilation of CLI generated source file, in order to avoid all those warnings.
With VC++, you shall use the following pragma instruction:
#pragma warning(disable:4102)
either by putting it in a cli/pch.h as described in the Pre-compiled headers section,
or by using generated code sections as described in the cpp, java
- Insert target language directly in the resource file section.
The problem must be because you are using standard outputs (printf, std::cout...),
while the cli is ran with a cli::Console device which relies on the ncurses library on Linux platforms.
Mixing standard and ncurses outputs does not behave correctly.
Indeed, you should always use the output and error devices used by your Cli (and Shell),
even in your user code.
Here is a way of doing it:
<keyword string="bye"><help lang="en">Say goodbye.</help>
 <endl><cpp>sayBye(<out/>);</cpp></endl>
</keyword>
Notice the use of out that references the cli/shell output device.
Could also be err for the error device.
See Output example.
Then:
void sayBye(const cli::OutputDevice& CLI_Out)
{
    CLI_Out << "Bye" << cli::endl;
    CLI_Out << "Bye Again" << cli::endl;
}
Notice the use of CLI_Out instead of std::cout, and the use of cli::endl instead of std::endl.
By the way, if you ever wish to change that device later on (for telnet input/output for instance, or a serial port...),
you would just have to change the kind of device given to the Shell instance for running.
Here is a sample with file devices:
void runShellWithFiles()
{
    MyCli cli_MyCli;
    cli::Shell cli_Shell(cli_MyCli);
    cli::OutputFileDevice cli_OutFile("output.log", false);
    cli::InputFileDevice cli_InFile("input.cli", cli_OutFile, false);
    cli_Shell.Run(cli_InFile);
}
7.3.2. The Java integration sample gets stuck when executed under Cygwin!
The very short answer to this issue is: please do not use the default Cygwin mintty terminal for CLI Java programs, use cmd.exe instead.
Here is the explanation below.
On the one hand, regarding the Java implementation of the CLI library, you should first be aware that it relies on the use of the JNI technology. This choice of design basically comes from the will not to multiply development efforts between the various programming languages supported, and keep the core of it in the C++ implementation only. But regardless of the operating system, the use of JNI is mandatory: the Java side alone cannot catch input keys typed in a console, and a native library needs to be called anyway.
On the other hand, in as much as this CLI toolkit is provided with a toolchain based on Linux commands and makefiles, Cygwin is one of the straight forward candidates as a development environment.
Unfortunately, the JNI technology integrates poorly in a Cygwin environment. Please read through the "Using Java / JNI on Cygwin" Stack Overflow question page, and particularly this following answer:
I couldn't get JNI to work with Cygwin's g++ -- that induces a dependency oncygwin1.dll, which clashes with the JNI mechanism, causing a crash. The-mno-cygwinflag is no longer supported. But using /bin/x86_64-w64-mingw32-g++.exe fixed the problem for me.
That's the reason why the Java implementation is compiled and linked with mingw compilation and linkage.
By the way, the regular Cygwin/Linux ncurses_console.cpp input/output device cannot be used anymore,
and we have to rely on the native Windows win_console.cpp.
Eventually, the CLI Java programs compile and link correctly with a Cygwin environment, but still do not run correctly in the mintty terminal that comes by default with Cygwin. Nevertheless, if you try to run the given java command line in a regular cmd.exe console, it works as expected.
At the end of it, here are some workarounds we could suggest.
If you want to use Cygwin as your development environment (for compilation, linkage as well as execution and debugging):
- launch a launch a cmd.exe console,
- and run the
Cygwin.batscript provided in your Cygwin install directory (eg:C:\cygwin64\Cygwin.bat).
In a console configured such a way, you may compile CLI programs and execute them as well.
Another option remains:
- you still can build the CLI library with a regular mintty Cygwin terminal as usual,
- then develop and debug your full application in another development environment (Eclipse or any other Java IDE).
I had once noticed strange behaviours with my WinConsole device, through Java execution under Cygwin:
- could not ensure the visibility of the cursor when moving it left or right,
- could not get the Windows optimized clean screen feature running, but had many blank lines printed out instead,
- ...
I then figured out that it was because I was executing the CLI within the context of a Makefile, launched through colormake, which uses output redirection. When using make directly, no problem anymore.
As a matter of fact, if you face non optimal behaviours with Console devices, please make sure no output redirection is used,
otherwise console primitives will operate on the pipe and not the console anymore.
Using a blocking execution integration, in a full application, may require the creation of a dedicated thread. By the way, thread programming implies common risks such as dead-locks or bad memory management.
Please consider using the non-blocking execution integration mode. Thanks to the real improvement of this feature in CLI 2.8, with the addition of execution context management, you shall now let the CLI execution take place directly within your regular execution context, without the need to thread it anymore which is a generally safer strategy.
The CLI library does not intend to be VC++ specific code, nor Eclipse specific, nor CodeWarrior... I do not intend neither to "pollute" the CLI sources with various compiler specific macros. That's the reason why regular VC++ memory leak macros are not set in the CLI sources, even guarded by pre-compilation switches.
Nevertheless, I've tried to deal with memory leaks so far. A special thank to Oleg Smolsky's contribution at this point, for another one detected and fixed. Now if you figure out that leaks still remain, up to you to set your macros in the CLI sources for investigations, depending on the tool you use: VC++, valgrind... I'll be glad to integrate your fixes if you have any.
Hopefully, unit tests provided are expected to work :-) However, in as much as telnet unit tests generate and execute binaries that open server sockets and others with client sockets, those binaries could be blocked by your antivirus.
If so, configuring antivirus exceptions for binaries generated in your CLI directory should solve the problem.